Wednesday, July 20, 2011

Summer Fun

Hi Crafters!
It's been a busy summer out here in Central California.  I've been working hard in the garden in my spare time and haven't really had much time to craft.

The tomatoes are wonderful, but they are coming in by the bowlful.  Last weekend we canned salsa and this weekend I'm thinking I'll can some sauce.
We also picked the last of our Cherry Plums and made jelly.  It was delicious Sunday morning with biscuits :D

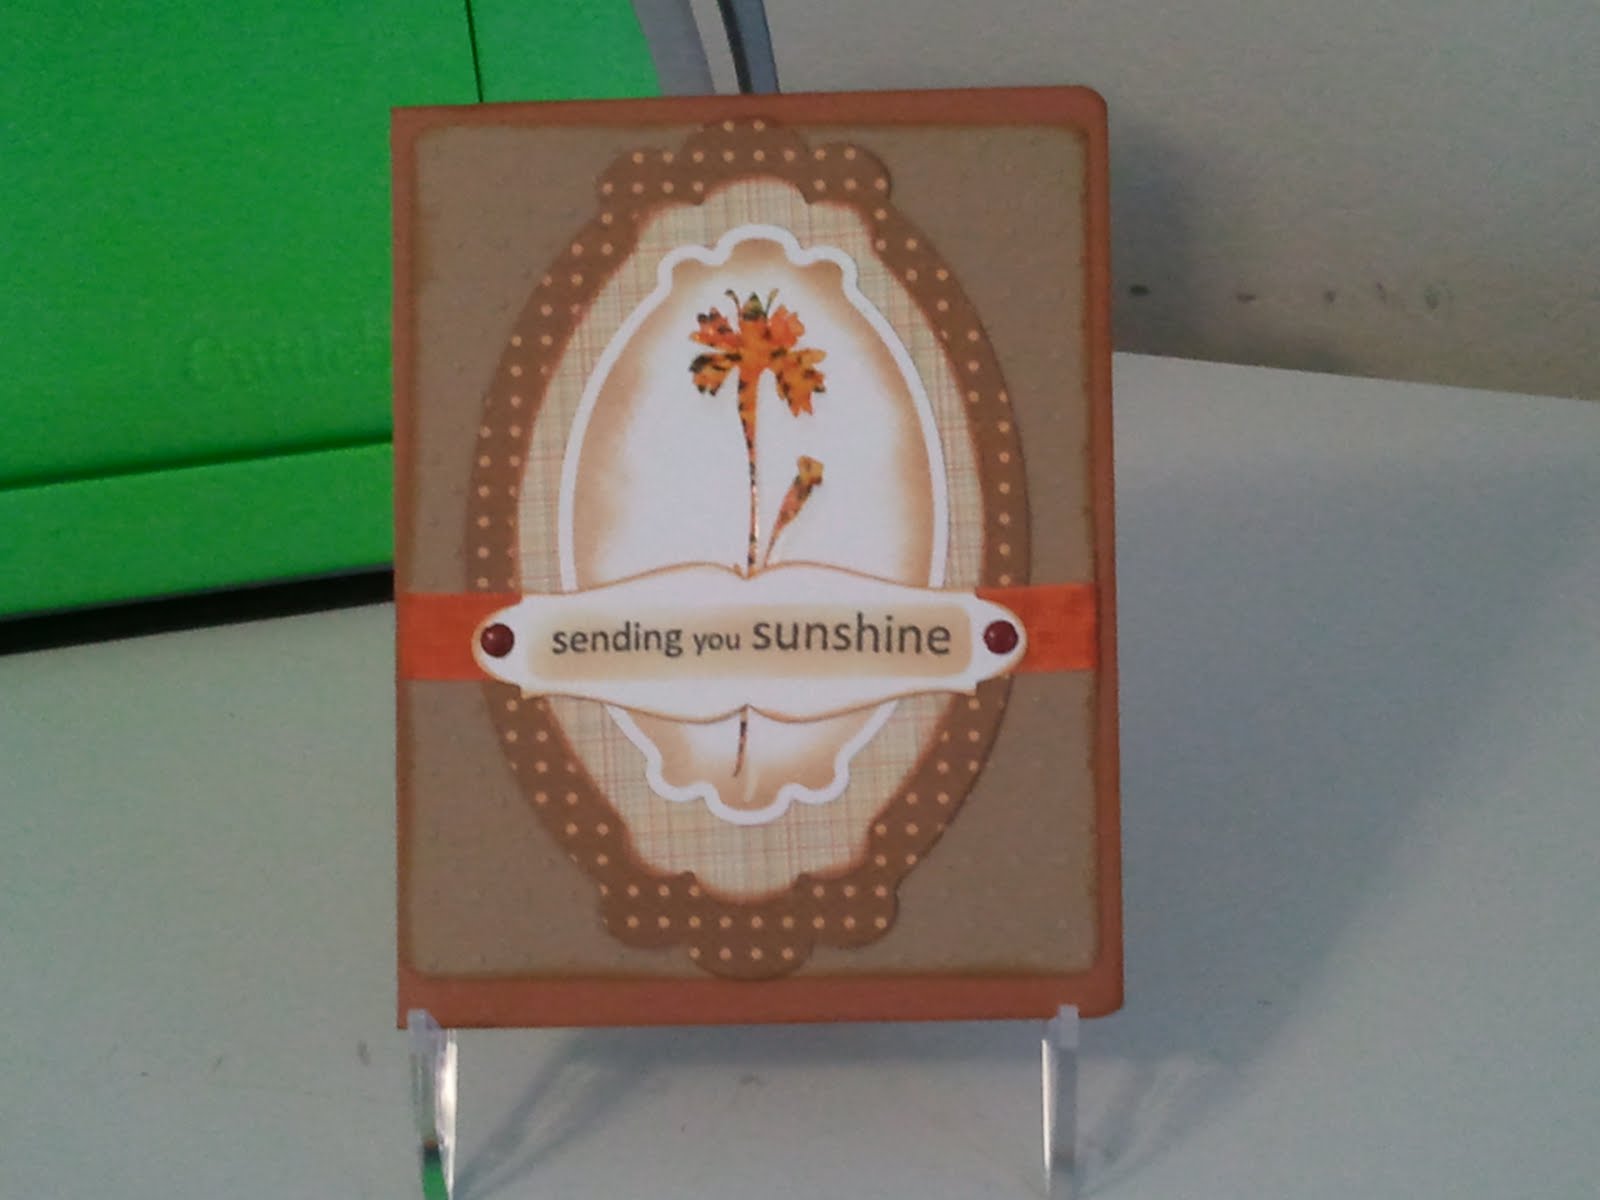
I finally had a chance to make a card this week.  If you love to make cards, one of the best places to get ideas and learn techniques is over at Stamp TV on youtube.  Gina K has the best tutorials.  I've learned so much from her... of course, she also has the coolest products and if you are like me, you might find yourself shopping for the latest thing she uses.  She really turned me on to Spellbinders dies which you can use with your cuttlebug.  I love all the Nestabilities for special matting for cards.

This card is my attempt to use the techniques Gina covered in the "Embossed Marble" video.  The flower was stamped after using the "thumping technique" and then using clear embossing powder over the stamped image, it gives it depth and shine.  The cuts for the image and the sentiment on the inside were from Spellbinders Labels 10.    I used the Spellbinders Grommets label for the outside sentiments.  Image and sentiments are from Gina K website

Everyone try to stay cool and have a great week!
Twila :D

Monday, May 2, 2011

Spring Garden

Today was an absolutely beautiful day in Central California so I couldn't resist taking a few photos of my Spring Garden.
Believe it or not I started most of my plants in my indoor Aerogarden.  If you've never had one of these, they are amazing.  If you get the garden insert, you can start up to 66 plants at once.  I started tomatoes, peppers, swiss chard, tomatillos, cucumbers and a few herbs.  It's a great way to jump start the process.  After a few weeks, I hardened them off in my outdoor greenhouse and then eventually moved them out to the garden.

We've already been eating the greens, onions, some peppers and of course taking advantage of the herbs.  Now my strawberries are ready to pick, so I'm thinking I might make Strawberry ice cream this weekend :D  Can't wait for that perfect time of year when I have all the salsa ingredients at the same time, tomatoes, peppers, onions and cilantro!
This is one of my Ruby Red grapefruit trees - I swear there were about 150 of them this year, we are still eating them.  Super sweet and yummy!

The pool looks inviting, but it's still a bit too cold to jump in :-)
Ok - so I really have to get back to my crafting and get my Mother's Day cards finished!   Did Mother's Day sneak up on anyone else out there?
Hope all is well with everyone out there :-)
Twila

Tuesday, March 22, 2011

Made by Momo Followers

Hi everyone - if you are visiting me from Momo's blog....http://madebymomo.blogspot.com/

or if you've been on my You  Tube channel (tjscrafts) and are visiting........

"WELCOME"   :-D

Please leave me a comment and I'll come visit you, too.

I post card-making, crafty projects, product demos and recipes.

I've never solicited followers, but just added the button to my blog.  If you like what you see, please let me know and follow.

Happy Crafting!

TJ

Twila's Easy Microwave Spanish Rice

I promised I would post this recipe after our "Fiesta party" last week.  No one could believe it was so easy and prepared in the microwave.  Hope you enjoy :D


Twila's Easy Microwave Spanish Rice
Ingredients
1 cup  rice (not instant rice) if you are watching your carbs use Uncle Ben's converted rice.
1 - 1/2 cups water
1 tablespoon chicken base i.e. Tones  (or a dissolved  boillion cube)
1 can of your favorite salsa (I use the 7 oz Herdez Salsa Casera)
salt & pepper & chili powder to taste

Directions:
in a microwave safe dish, add rice and just enough water to cover the rice, then stir in the chicken base or bouilliion).  Microwave uncovered  on high for 8 minutes or until water dissappears.  Take out and fluff up with fork and then cover with water again.  Microwave on high for another 5 minutes.

Fluff with fork - add chili powder, salt & pepper and can of salsa and stir with fork to mix.

Cook another 4=5 minutes and let stand for 5-10 minutes.  I sometimes let it stand for up to 15 minutes with the lid on.

Rice should be perfect!

Friday, February 18, 2011

"You are my Hero" - Scrappy Moms & Copics

Love the Copic Markers and my Scrappy Mom stamp sets!  The copics are so wonderful for line-art stamp images and you can bet Scrappy Moms has a stamp set to match just about anything!.  I made this card for my hubby, because he is my "hero" every day :-).

This is a full-sized card.  The eagle is a rubber stamp from Stampabilities (Hobby Lobby).  For the eagle I stamped with Tuxedo Black "Memento" ink and used the Copic markers (for the beak and talons I blended Y15 and Y11.  For the head I blended C1 and C3.  For the body/feathers I used E09,YR24,E29.YR04,Y15 blending them as I added colors. At the end I used the colorless blender on select areas to highlight). Then I cut the eagle out with my Cuttlebug and the large round Nestabilities die-cut. After cutting, with the round die-cut still in place, I used Ranger Distressed Ink "Walnut Stain" with my daubber to ink the edges, so that when you remove the die-cut circle, you get that defined edge.  The mat behind the eagle is cut with the Scalloped large circle Nestabilities from a mat stack.  The sentiment is from Scrappy Mom's "For the Boys" set.  Before adhering my Rust mat to the black mat, I tied the coordinating ribbon around the rust mat. I used my corner rounder on both mats and then used pop dots for the eagle and scalloped mat.

TJ :-)

Wednesday, February 16, 2011

Hubby's Valentine's Card

Since I couldn't wait to give my hubby the first valentine card I made for Momo's Tuesday Challenge I just had to make him another "official" Valentine's card.   I finally got my camera out and took a picture to share.


This is a full sized greeting card.  For the floral mat, this was from a K&company mat pad "Madeline". I cut a slightly larger black mat to go behind it. Before adhering it to the black mat, I added the pink ribbon.  For the hearts I used my Cuttlebug and  the plain and scalloped Nestabilities from Spellbinder.  I also used a Spellbinder  "Fancy Label" and cut it in half and adhered each side to the back of the scalloped heart.  Then I used Ice Stickles to bling it up.  The center glittered heart was from a pack of hearts I got at Dollar Tree. I used dimensionals for the top two hearts for that three-d effect. For the sentiment, that's from Scrappy mom's "love notes" clear stamps.  I stamped it and then cut it out again with my Cuttlebug and the small square nestabilities from Spellbinder.  I cut the next size larger for the black mat and then turned it over and embossed it to define the edge, then I used pop-dots for dimension.

This card is really pretty in person.  Hubby loved it :)

Wednesday, February 9, 2011

Cheese Roll Recipe

This is an awesome recipe for stuffed rolls.  I know the ingredients sound a little strange, but they are a big hit at potlucks.

Enjoy!

Ingredients:
1 lb grated cheddar cheese
5 green onions
1/2 cup oil
1/2 bell pepper
1 small can tomato sauce
2 hardboiled eggs
1 small jar chopped pimento
1 small can chopped olives
1 bag of dinner rolls (like from Costco or Sams)


Directions:
Grind all ingredients together and spread lightly on rolls that have been split in half.
Put the halves back together and wrap in foil
Refrigerate until ready to bake
Bake 15-20 min at 350.
Will fill 3 dozen rolls.

Tuesday, February 8, 2011

Hallmark 2011 Card Studio - Valentine's Day Cards

Once again, I've used Hallmark 2011 Card Studio for my base card for my parents and aunt's cards this year.

Don't they look great?


I also used studio to add picture and fill out the addresses with my ink jet printer for coordinating envelopes.  Just love that feature!

Friday, February 4, 2011

Momo's Tuesday Challenge Card

Momo's challenge this week is to make something using Black, White & Hot Pink.... and it has to have a heart. (http://madebymomo.blogspot.com/)


I used the Hello Kitty Cartridge which I just recently purchased on sale - Miss Kitty is super cute :D.    I cut her at 4.5 inches with a 4.75 blackout layer.  Instead of Miss Kitty's bow cut out I used a prima flower with embellishments and then used Ice Stickles around the heart and a little pink bling for her nose.  The "Be mine" stamp is from Scrappy Mom's Love Notes stamp collection.

For the inside sentiment (also from "love notes") I use the Spellbinders nestabilities hearts (both plan & scalloped) in my cuttlebug, then I used my versamarker pen to highlight the scalloped edge of the heart mat and then used embossing powder to really define that scallopped edge.   Hope you enjoy!

Here's the video